The Android Guide
Android History
Android is a technology which has developed so fast that we have Android all around us. Initially developed for mobile devices like mobile phones and tablets Android has now made its way to wrist watches, digital camera, television sets etc.
Android Incorporation was founded in Palo Alto, California, United States in October, 2003 by Andy Rubin : co-founder of Danger (Danger Incorporation was a company exclusively in platforms, software, design, and services for mobile computing devices), Rich Miner : co-founder of Wildfire Communications, Incorporation, Nick Sears : once VP at T-Mobile, and Chris White : headed design and interface development at Web TV.
Google took over Android Incorporation in August 2005, making Android Incorporation a entire owned property of Google Incorporation main employees of Android Incorporation, including Andy Rubin, Rich Miner and Chris White, stayed at the company after the possession of Google.
After that on 12, November 2007 Android beta SDK was released. On 23 September, 2008 the first Android device is launched, that is HTC Dream G1 which operates Android 1.0, and after that android shows 1.1 update which was released for T-Mobile G1 only.
On November 5, 2007, the Open Handset Alliance, a bunch of several companies which include Broadcom Corporation, Google, HTC, Intel, LG, Marvell Technology Group, Motorola, Nvidia, Qualcomm, Samsung Electronics, Sprint Nextel, T-Mobile and Texas Instruments expose themselves in front of media itself. The aim of the Open Handset Alliance is to develop open standards for mobile devices. On the same day, the Open Handset Alliance also unveiled their first product, Android, a mobile device platform which is built on the Linux kernel (version 2.6).
Steps for installation
Prerequisites
- Java Development Kit(JDK preferably 1.6)
- Eclipse IDE (Preferably Indigo)
- Android SDK
Steps
1)Download Android sdk.
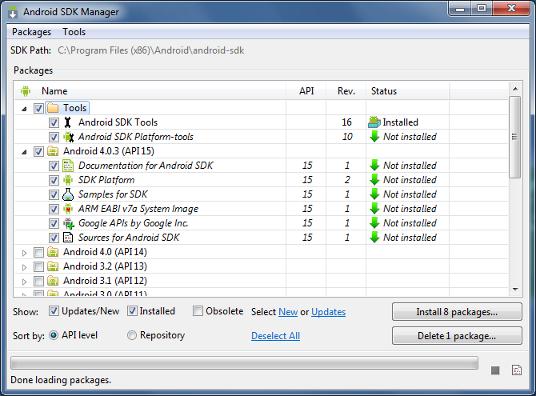
The Android SDK separates tools, platforms, and other components into packages you can download using the Android SDK Manager. The original SDK package you’ve downloaded includes only the SDK Tools. To develop an Android app, you also need to download at least one Android platform and the latest SDK Platform-tools.
You can update and install SDK packages at any time using the Android SDK Manager.

2)Install jdk
3)Install Eclipse
Configuring Eclipse for Android
Android offers a custom plugin for the Eclipse IDE, called Android Development Tools (ADT). This plugin is designed to give you a powerful, integrated environment in which to develop Android apps. It extends the capabilities of Eclipse to let you quickly set up new Android projects, build an app UI, debug your app, and export signed (or unsigned) app packages (APKs) for distribution.
Downloading ADT Plugin
- Start Eclipse, then select Help > Install New Software.
- Click Add, in the top-right corner.
- In the Add Repository dialog that appears, enter “ADT Plugin” for the Name and the following URL for the Location: https://dl-ssl.google.com/android/eclipse/
- Click OK. If you have trouble acquiring the plugin, try using “http” in the Location URL, instead of “https” (https is preferred for security reasons).
- In the Available Software dialog, select the checkbox next to Developer Tools and click Next.
- In the next window, you’ll see a list of the tools to be downloaded. Click Next.
- Read and accept the license agreements, then click Finish. If you get a security warning saying that the authenticity or validity of the software can’t be established, click OK.
- When the installation completes, restart Eclipse.
Configuring Eclipse for Android
After you’ve installed ADT and restarted Eclipse, you must specify the location of your Android SDK directory:
- Select Window > Preferences… to open the Preferences panel (on Mac OS X, select Eclipse > Preferences).
- Select Android from the left panel.
- You may see a dialog asking whether you want to send usage statistics to Google. If so, make your choice and click Proceed.
- For the SDK Location in the main panel, click Browse… and locate your downloaded Android SDK directory (such as android-sdk-windows).
- Click Apply, then OK.
Note: if you get an error saying missing java runtime environment you need to set the path of java in environment variables.